Get inspired with this spooky Halloween Cheese Board. We’ll teach you how to prepare a simple cheese board and how to make it a little creepy for Halloween.
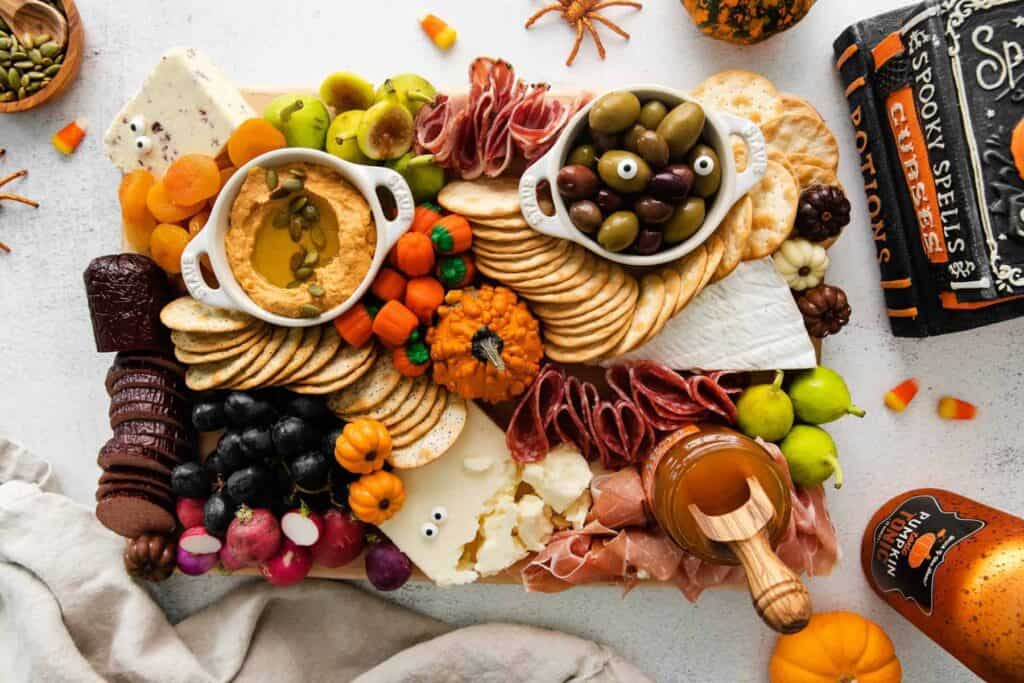
Festive Halloween Cheese Board
The ultimate Halloween cheese board is so easy to make and serves a crowd. It’s truly the perfect festive Halloween party appetizer.
We’re all about the cheese board, and this one hits all of the major buckets of what needs to be in a cheese board, but we made it spooky with some simple additions.
Candy eyes, dark fruit, and candy pumpkins steal the show! Read on to learn how to make this recipe, plus get inspired to make it your own!

Components Of This Cheese Board
Cheese
It’s always a good idea to have one hard (cheddar, parmesan, gruyere), one soft (brie, camembert, feta), and one fun cheese (stilton, goat, burrata) on your board– but feel free to use whatever you like!
On this board, we’re using:
- Double cream brie
- aged cheddar
- stilton with cranberries
For good measure, we also kept a log of cranberry goat cheese on hand as a backup cheese in case we need to replenish the board.
How Much Cheese Should I Buy?
This board uses 2 pounds of cheese for 8 servings, or ¼ pound (4 ounces) per person. Adjust the amount based on your guest count and what else you’re serving.
Crackers
Crackers add great texture to the board and also crunch to every bite. We used 2 different kinds of simple crackers on our board, but you can always use 3 if you’re a cracker person.
We bought 2 boxes of crackers and replenished them as the night went on. Always make sure to have extras on hand.

Meat
For this board, use around 1.5 pounds of ready-to-eat cured or dried meats, such as summer sausage or salami labeled ready to eat. Check the package directions: curing alone does not mean a meat is ready to eat. If using pancetta, cook it according to the package directions before serving.
Spreads
We’re recommending 2 festive spreads/dips on your cheeseboard. You can go homemade or store-bought. Here are some ideas:
- Hummus
- Baked French Onion Dip
- Buffalo Whipped Cottage Cheese Dip
- Pimento Cheese Dip
- Whipped Feta Dip
- Apricot jam/spread

Fruit/Veggies
Fruit and veggies are really where you can customize your Halloween cheese board. You can use what you have on hand! Since Halloween is in late October, we recommend using what’s in season. Here are some ideas:
- Apples
- Radishes
- Carrots
- Dried apricot
- Broccoli
Grapes
We’re calling out grapes separately because they’re kind of spooky. Separate them into 2 bunches. We recommend using either black or dark purple grapes to get the most spook.
Fillers
Last but not least – fillers! Fillers are what make your cheese board fun and fill all the little holes! We’re using Halloween-inspired fillers to really up the ambiance. Here’s what we used:
- Pumpkin candy corn
- Candy eyes
- Olives
- Nuts and seeds
Another fun idea would be Halloween candy! You can unwrap them and fill all of the holes.

How To Build Your Halloween Cheese Board
- Start with bowls and a mini pumpkin: Leave plenty of space for the food.
- Add the cheeses and grapes: Place cheese near the edges so guests can reach it from each side.
- Curve the crackers around the bowls: Work from the center outward in C or S shapes.
- Fill in with ready-to-eat meats and produce: Arrange distinct piles on opposite sides for balance.
- Finish with fillers: Tuck dried fruit, nuts, seeds, and Halloween candy into the gaps. Add edible candy eyes for a spooky touch.
Keep plastic spiders and other decorations not labeled food-safe beside the board, not touching food. Remove non-edible decorations before serving.
Serving And Storing Your Cheese Board
Keep perishable cheeses, meats, cut produce, and dips refrigerated at 40°F or below until serving. For a longer party, serve smaller portions and replace nearly empty platters with fresh ones from the refrigerator instead of topping up food that has been sitting out. Discard perishable food left out for more than 2 hours, or 1 hour if the temperature is above 90°F, unless it has been kept at 40°F or below.
Refrigerate eligible leftovers promptly in covered containers within those limits. Store crackers, nuts, seeds, and candy separately from moist ingredients. Follow the storage instructions for each cheese, meat, and dip, and use the shortest applicable storage window. Refrigeration does not make food safe again once it has exceeded the serving-time limit.

Halloween Cheese Board

Ingredients
- 2 pounds cheese
- 1.5 pounds cured or dried meats
- 2 festive spreads
- 2 bunches grapes, about 1 bag
- 2 additional fruits or vegetables
- 2 boxes crackers
- 3 “Fillers”
- Mini Pumpkins, optional
Instructions
- Add a few bowls and a mini pumpkin to your board. It should take up no more than one quarter of your board– if it takes up more than that, you’ll need a larger board.
- Next, add your largest elements to the board– in this case, the cheeses and grapes. I like to place the cheeses near the edge of the board making sure there is at least one cheese accessible from each side of the board.
- Working from the center of the board outward, use the crackers to create either “c” shaped or “s” shaped curves around the bowls. This will help add movement for your eyes!
- Now it’s time to add your fruits, vegetables, and meats. I like to keep big piles of ingredients so you can really see them! I also recommend adding the piles on opposite sides of the board– for example, the radishes and figs are on opposite sides of the board just like the salamis. Use only ready-to-eat meats; cook pancetta according to its package directions before serving.
- The last step is to add your fillers! You want the board to look full and abundant so don’t be shy while you’re filling in any gaps. Just make sure to keep big piles of ingredients so you can see what everything is.
- (Optional) Add edible candy eyes for a spooky touch. Keep plastic spiders and any decorations not labeled food-safe beside the board, away from food, and remove non-edible decorations before serving.
Tips & Notes
- This board uses 2 pounds of cheese for 8 servings, or ¼ pound (4 ounces) per person but keep in mind that you may need to increase or decrease this amount based on what else you’re serving. It’s always a good idea to have one hard (cheddar, parmesan, gruyere), one soft (brie, camembert, feta) and one fun cheese (stilton, goat, burrata) on your board– but feel free to use whatever you like!
- Keep perishable cheeses, meats, cut produce, and dips refrigerated at 40°F or below until serving. For a longer party, serve smaller portions and replace nearly empty platters with fresh ones from the refrigerator instead of topping up food that has been sitting out. Discard perishable food left out for more than 2 hours, or 1 hour if the temperature is above 90°F, unless it has been kept at 40°F or below.
Nutrition
Nutrition information is automatically calculated, so should only be used as an approximation.
Don’t forget to tag your posts on social media with the hashtag #cheeseknees, we’d love to see what you’re up to!
Related Recipes