Chocolate and Cheese Board
6/22/2022
This post may contain affiliate links. Please read our disclosure policy.
This chocolate and cheese board is an amazing appetizer to fancy up any occasion. Learn how to make a chocolate and cheese board with our simple tips and tricks.

Let’s Make a Chocolate and Cheese Board
Looking to whip up the most delicious and beautiful chocolate and cheese board for a party or get together? In this post, we’ll teach you how to build the best chocolate and cheese board.
Obviously, every chocolate and cheese board needs a great variety of cheese and chocolate. But, building a great board is all about adding elements that complement the specific cheeses and chocolates you’ve chosen.
before you start
The best chocolate and cheese boards have a variety of flavors and textures, so think about what ingredients would complement each other and place those around each other on your board.

Start with Largest Ingredients
Start by adding your largest ingredients to the board — in this case, the grapes, brie and manchego. We sliced the manchego into triangles to make it easier to pick up — but feel free to leave the wedge whole if you prefer.
Add Movement to the Board
Add some movement on your board! This is often easiest to do with crackers, so we spread the water crackers in a line through the middle of the board. You could also spread them down the side of the board if you prefer.
It’s Chocolate Time
Now it’s time to fill in the board with your next largest elements — in our case the chocolate bars, salami, and chocolate-covered pretzels. Make sure to add the elements in big clumps so you really see them!
Fill in the Holes
The last step is to fill it all in. We want to really cover the board so use your remaining small ingredients (in our case the figs, strawberries and cherries) to fill in any gaps on your board.
Serve & Enjoy!
Serve immediately, and enjoy your beautiful creation!

Chocolate and Cheese Board Tips
#1 TIP – FILL IT UP!
The number one most important tip whenever making any charcuterie or cheese board: make your board look abundant! We try to cover up as much of the wood as possible. You want people to focus on all of the delicious food, not an empty board.
Cut Into CHEESES
Another great trick to get people to actually enjoy the board is to cut into the blocks of cheese if you’re not planning to pre-slice them. No one wants to be the first person to cut into a piece of cheese, but they’ll take some if it’s already cut.
For this board, we cut slices of manchego into triangles so it is easy to grab as well as cut the brie in half and placed one on its side, so it was more inviting.
DON’T FORGET UTENSILS!
Don’t forget the utensils! Make sure to have plenty of cheese knives, small tongs, or toothpicks around so everyone can grab their food without putting their hands on everyone else’s!
Get Creative with Ingredients
Don’t have some of the ingredients this recipe calls for on hand? Make substitutions, such as:
- Another variety of cheese
- Different fresh fruit
- Dried fruit
- Any bite-sized chocolate candies


What kind of board should I use?
You’re more than welcome to use boards that are designed for cheese boards, but really anything will work! So don’t feel pressured to spend a ton of money on an expensive board.
- cutting boards
- baking sheet
- shallow casserole dish
- marble slab
Picking the Right Board Size
Now that you’ve chosen all of the elements of your board, it’s time to figure out the actual board your cheese board will live on. This can feel intimidating, but it doesn’t need to be!
LARGE
For large crowds or parties, use the biggest board you have– something in the 18-24” range.
MEDIUM
For afternoon cheese boards or appetizers between friends, something in the 10-12” range.
SMALL
And for small cheese boards for 2 or fewer, we usually opt for something 6-8”. If you don’t have a board, you can always assemble your cheese display right on the counter or table!
Just make sure to put down some parchment or butcher paper first so you don’t end up with too much of a mess.

Storage
Got leftover meat, cheese or chocolate? Whatever you do, don’t throw it out! All of these things can easily be stored for later.
We recommend wapping each block of cheese in parchment paper and then storing them in a large plastic bag. Most cheese will last up to 2 weeks if properly stored.
As for the fruit, meats, and chocolate we recommend separating those out and storing the fruit with fruit and meats with meats.

Chocolate and Cheese Board
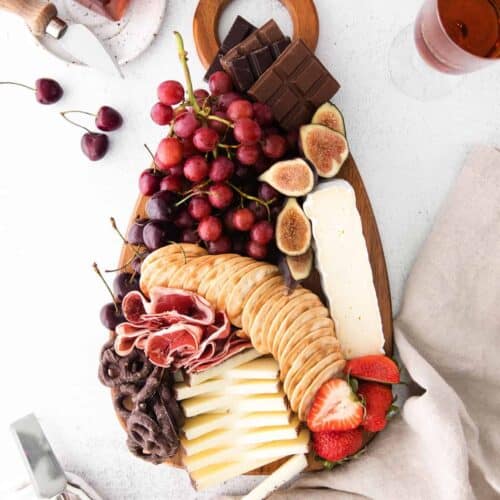
Ingredients
- ¼ lb. double cream brie
- ¼ lb. 12-month aged manchego
- 1 bunch grapes
- 1 box plain water crackers
- ¼ cup chocolate covered pretzels
- 2 chocolate bars
- 1 oz. salami
- ½ cup figs, halved
- ½ cup strawberries
- ¼ cup cherries
Instructions
- First, add your largest ingredients to the board-- in this case the grapes, brie, and manchego. I sliced the manchego into triangles to make it easier to pick up-- but feel free to leave the wedge whole if you prefer.
- Next, add movement on the board! This is often easiest to do with crackers so I spread the water crackers in a line through the middle of the board. You could also spread them down the side of the board if you prefer.
- Now it’s time to fill in the board with your next largest elements-- in our case the chocolate bars, salami, and chocolate-covered pretzels. Make sure to add the elements in big clumps so you really see them!
- The last step is to fill it all in. We want to really cover the board so use your remaining small ingredients (in our case the figs, strawberries, and cherries) to fill in any gaps.
- Serve immediately and enjoy! Store any leftover elements in separate airtight containers in the fridge for up to three days.
Nutrition
Nutrition information is automatically calculated, so should only be used as an approximation.
Don't forget to tag your posts on social media with the hashtag #cheeseknees, we'd love to see what you're up to!


My 2 favorites! Chocolate and cheese!! Delicious!