Tiramisu Cake (Light & Fluffy)
4/13/2026
This post may contain affiliate links. Please read our disclosure policy.
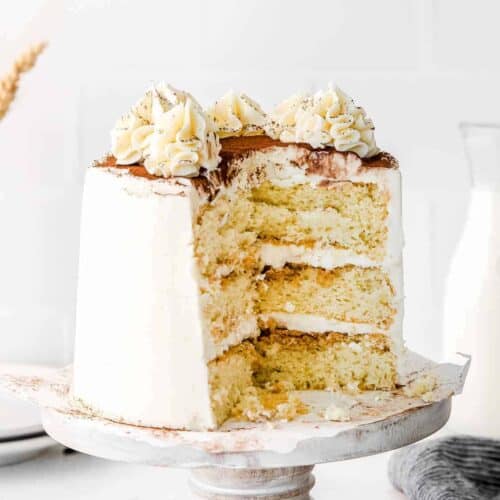
Featuring three gorgeous layers of espresso-brushed sponge cake, a creamy mascarpone filling, and dusting of cocoa powder, this tiramisu cake combines traditional tiramisu flavors with a stunning presentation. The light and fluffy cake crumb pairs beautifully with the rich mascarpone layer for balanced flavor and texture in each bite. Served chilled, this layer cake is a wonderful make-ahead dessert recipe worthy of any celebration.

Why I’m Obsessed
- Plenty of classic tiramisu flavor
- Perfect texture – no soggy layers here!
- Must be chilled prior to serving so it’s literally a make-ahead dessert
- Slices easily for beautiful plating
- Impressive yet easy to make – ideal for any occasion
- A tasty alternative to classic tiramisu, strawberry tiramisu, or eggnog tiramisu
What You’ll Need
Sometimes the fanciest desserts require the least amount of ingredients – only 10 needed for this showstopper! There are 3 parts to tiramisu cake and here’s what you need for each:
Sponge cake
- Eggs: The base of the sponge cake. Make sure they’re at room temperature so they whip smoothly.
- Sugar: Sweetens the cake.
- Flour: A little all-purpose flour adds structure.
- Baking powder: Helps the cake rise and creates a light, fluffy texture.
- Cinnamon: Adds a hint of warmth and spice that complements the espresso and cocoa powder.
Mascarpone frosting
- Cream cheese: Adds structure and a little bit of tang. Make sure to use room temperature cream cheese to avoid a lumpy frosting.
- Mascarpone: For classic tiramisu flavor. I like to use a combination of cream cheese and mascarpone cheese so the frosting is sturdy enough to hold up to the weight of the layers.
- Butter: The base of the frosting. Make sure the butter is softened to room temperature so it incorporates well with both creamy cheeses.
- Powdered sugar: Adds structure and sweetness. For best results, sift it before using to get any lumps out.
- Vanilla extract: Enhances the overall flavor.
extras
- Coffee or espresso: Brush strongly brewed coffee or espresso (my favorite) onto each layer of the cake before frosting.
- Cocoa powder: Sift unsweetened cocoa powder on top of the tiramisu cake for a beautiful garnish.

How to Make Tiramisu Cake
Tiramisu cake is simple to make, but requires a bit of patience and precision. Please refer to the recipe card at the bottom of this post for the full recipe with ingredient measurements and simple steps.
Tip: Before beginning, make sure the eggs, cream cheese, and butter are all at room temperature!
Make the Sponge Cake Layers
Prepare three 6-inch cake pans for sponge cake batter. Use nonstick baking spray to grease the bottom of each cake pan (do not spray the sides). Line the bottom of the pans with parchment paper rounds.
Use a stand mixer fitted with the whisk attachment to beat the eggs on medium-high speed and slowly add the granulated sugar. After the sugar has been incorporated, continue beating until the batter reaches the “ribbon” stage (the batter should fall like a ribbon off of the beater), about 5-8 minutes. This step of whipping the eggs creates an airy, fluffy base for the sponge cake layers.
Gently fold the sifted dry ingredients into the egg mixture to avoid deflating the eggs which creates a dense crumb. The goal is a light texture! Transfer the cake batter to prepared 6-inch cake pans and bake. The cakes are done when a toothpick inserted into the center comes out clean, about about 15-18 minutes at 350°F.
Make the Mascarpone Frosting
While the cakes bake, make the creamy frosting. Make sure the butter and cream cheese are at room temperature before adding the the bowl of a stand mixer. Use the whisk attachment to mix on medium speed until the mixture is smooth and fully combined – scrape down the sides/bottom of the bowl as needed.
Slowly add the powdered sugar and vanilla extract. Once somewhat incorporated, increase the mixer to high speed until the frosting is light and fluffy. This should take about 2-3 minutes – any longer and there’s a risk of curdling the frosting.
Assemble
Brush the tops of the cooled cake layers with strongly brewed espresso. When it’s time to assemble, the order will go: brushed side up (bottom layer), brushed side up (middle layer), brushed side down (top layer). The cakes don’t need any soak time – they’re ready to use immediately – something I personally love about this recipe!
Place the bottom cake layer onto a cake stand or serving plate. Spread about 1/3 of the frosting on top, all the way to the edges. Repeat the same process with the second (middle) layer.
Add the top cake layer espresso side-down (keeps the top of the cake smooth and even). Use an offset spatula to spread a few spoonfuls of frosting evenly on top and down the sides. Sift a generous layer of cocoa powder on top for a gorgeous garnish and traditional tiramisu flavor.
Chill
Loosely cover the cake with plastic wrap and refrigerate for at least 4 hours prior to serving (and up to 3 days). When ready to serve, remove from the refrigerator, slice, and enjoy.

Easy Flavor Swaps & Variations
- For more espresso flavor, try adding a splash of coffee liqueur to the brewed espresso before brushing it onto each layer.
- Add a little cinnamon to the sifted cocoa powder to enhance the cinnamon in the cake layers.
- For a gluten free tiramisu cake, use a 1:1 gluten free flour replacement (like Cup4Cup) in place of the flour.

How to Serve It
Slices are best enjoyed cold with a hot cup of espresso or glass of dessert wine for an indulgent treat. For a little something extra, add a dollop of whipped cream, sprinkle of cocoa powder, chocolate curls, or a few fresh raspberries to each slice before enjoying. This decadent layer cake is always ideal for birthdays, baby or bridal showers, Mother’s Day, or any other special celebration.
For a Beautifully Frosted Cake
Sponge cakes are notoriously difficult to frost because they’re so light and airy. Before assembling the cake, wrap the baked cake layers in plastic wrap and freeze for at least 4 hours. When ready to assemble, remove them from the freezer, brush the tops with espresso, and continue with the recipe as written. This extra step of freezing the cakes is optional, but makes it much firmer and easier to frost.
For a tiramisu cake with incredibly smooth frosted sides, use an offset spatula and a bench scraper. Heat them up under hot water and run along the sides of the cake for perfect edges.

FAQ
Both are made with a sponge and mascarpone and have the same delightful flavors. Classic tiramisu is a no-bake Italian dessert that combines espresso-soaked ladyfingers with a mascarpone cream while tiramisu cake features fluffy sponge cake layers instead of ladyfingers. Tiramisu cake is also sliceable while traditional tiramisu is scooped from a dish for serving.
If whipped on high speed for too long, the mascarpone cheese mixture can curdle. Keep an eye on the frosting and stop mixing when it’s smooth and creamy.
Ladyfingers!

Storing Leftovers
Loosely cover tiramisu cake with plastic wrap or place in an airtight container and refrigerate for up to 3 days. The flavors will intensify as the cake chills.
For longer storage, tightly wrap individual slices in a layer of plastic wrap and a layer of aluminum foil and freeze for up to 1 month. Thaw overnight in the refrigerator before serving.


Tiramisu Layer Cake
Ingredients
For the Sponge Cake
- 6 large eggs*, room temperature
- 1 cup granulated sugar
- 1 cup all purpose flour
- 1 teaspoon baking powder
- 1/2 teaspoon ground cinnamon
For the Mascarpone Frosting
- 4 ounces cream cheese, room temperature
- 4 ounces mascarpone cheese, cold
- 1 cup butter, room temperature (2 sticks)
- 5 cups powdered sugar
- 1 teaspoon pure vanilla extract
For Assembly
- 1/4 cup strongly brewed coffee or espresso
- 1/4 cup unsweetened cocoa powder, for garnish
Instructions
Make the Cake
- Preheat the oven to 350°F. Grease the bottom of three 6-inch round cake pans with nonstick baking spray (do not grease the sides of the pan). Line the bottoms of the pan with parchment paper rounds and set them aside.
- Add the eggs to the bowl of a stand mixer fitted with the whisk attachment. Beat on medium-high speed while slowly adding the granulated sugar. Once all of the sugar has been added, continue beating for 5-8 minutes or until the batter reaches the “ribbon stage" – the batter should fall like a ribbon off of the whisk.
- Sift the flour, baking powder, and cinnamon into the egg mixture. Use a spatula to gently fold it in – being careful to avoid deflating the eggs.
- Divide the batter between the pans and bake for 15-18 minutes, or until a toothpick inserted into the center comes out clean.
- Allow the cakes to cool in the pan for 10 minutes. Run a knife around the edge and turn each layer onto a wire rack to cool completely before frosting.
- Optional: Wrap the baked cake layers in plastic wrap and freeze for at least 4 hours. When ready to assemble, remove them from the freezer, brush the tops with espresso, and continue with the recipe as written. This extra step of freezing the cakes is optional, but makes it much firmer and easier to frost.
Make the Frosting
- Add the cream cheese, mascarpone cheese, and butter to the bowl of a stand mixer fitted with the whisk attachment. Beat on medium speed for 1-2 minutes or until the mixture is smooth and fully combined.
- With the mixer on low speed, slowly add the powdered sugar. Use a spatula to scrape down the sides of the bowl as needed.
- Add the vanilla extract and turn the mixer to high speed. Beat for 2-3 minutes, or until the frosting is light and fluffy.
Assemble the Cake
- Brush the tops of the cooled cake layers with strongly brewed espresso.
- Place the bottom layer of cake* (brushed side up) onto a cake stand or dessert plate. Spread about 1/3 of the frosting on top, all the way to the edges.
- Repeat the same process with the second (middle) layer.
- Add the top cake layer espresso side-down (keeps the top of the cake smooth and even). Use an offset spatula to spread a few spoonfuls of frosting evenly on top and down the sides.
- Add any remaining frosting to a piping bag and decorate the top of the cake, if desired.
- Sift a generous layer of cocoa powder on top of the cake.
- Loosely cover the cake with plastic wrap and refrigerate for 4 hours (up to 3 days). Serve chilled and enjoy!
Tips & Notes
- Eggs: Use room temperature eggs so they whip smoothly which creates a light, airy crumb.
- Assembly order: When it’s time to assemble, the order of the cake layers will be: brushed side up (bottom layer), brushed side up (middle layer), brushed side down (top layer).
Nutrition
Nutrition information is automatically calculated, so should only be used as an approximation.
Don’t forget to tag your posts on social media with the hashtag #cheeseknees, we’d love to see what you’re up to!