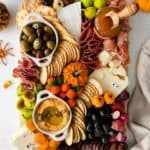
Halloween Cheese Board
Make this festive Halloween cheese board for a spooky appetizer to serve to your Halloween party guests!
Prep 20 minutes
Cook 0 minutes
Total 20 minutes
Fat 27
Carbs 62
Protein 20
Yield 8
Ingredients
- 2 pounds cheese
- 1.5 pounds cured or dried meats
- 2 festive spreads
- 2 bunches grapes about 1 bag
- 2 additional fruits or vegetables
- 2 boxes crackers
- 3 “Fillers”
- Mini Pumpkins optional
Instructions
- Add a few bowls and a mini pumpkin to your board. It should take up no more than one quarter of your board-- if it takes up more than that, you’ll need a larger board.
- Next, add your largest elements to the board-- in this case, the cheeses and grapes. I like to place the cheeses near the edge of the board making sure there is at least one cheese accessible from each side of the board.
- Working from the center of the board outward, use the crackers to create either “c” shaped or “s” shaped curves around the bowls. This will help add movement for your eyes!
- Now it’s time to add your fruits, vegetables, and meats. I like to keep big piles of ingredients so you can really see them! I also recommend adding the piles on opposite sides of the board-- for example, the radishes and figs are on opposite sides of the board just like the salamis.
- The last step is to add your fillers! You want the board to look full and abundant so don’t be shy while you’re filling in any gaps. Just make sure to keep big piles of ingredients so you can see what everything is.
- (Optional) If you want to add spooky touches, candy eyes and plastic spiders really make this board come to life!
Tips & Notes
- We recommend ⅓ pound of cheese per person for grazing but keep in mind that you may need to increase or decrease this amount based on what else you’re serving. It’s always a good idea to have one hard (cheddar, parmesan, gruyere), one soft (brie, camembert, feta) and one fun cheese (stilton, goat, burrata) on your board-- but feel free to use whatever you like!
Nutrition Facts
Calories: 568kcal | Carbohydrates: 62g | Protein: 20g | Fat: 27g | Fiber: 8g | Sugar: 31g